If you are building an n8n lead generation workflow for local prospecting, the hard part is getting reliable business records, websites, phone numbers, and contact emails without maintaining browser selectors or brittle scraping scripts. biz collect gives n8n a cleaner path: send one HTTP request with a location, keywords, radius, and email-scraping option, receive an async job_id, then poll until the structured JSON results are ready. This guide shows how to build a complete n8n Google Maps leads workflow that finds local businesses, extracts deduped emails from business websites, and sends results to Google Sheets, HubSpot, Slack, or any downstream system.
Why Use an API for Local Lead Generation in n8n?
n8n is excellent for connecting systems: triggers, HTTP calls, conditional branches, data transforms, spreadsheets, CRMs, alerts, and scheduled jobs. But local lead generation has a data-acquisition step that can become messy if you try to automate it with browser scraping alone.
A typical "n8n Google Maps leads" setup often starts with a headless browser, a search URL, selectors for listing cards, and separate scraping logic for websites and emails. That can work for small experiments, but it creates maintenance work. Page layouts change, browser sessions fail, selectors break, and website email extraction becomes a second scraper. If that is where you are today, the Google Maps scraper alternative that returns JSON guide shows the API-first path this workflow relies on.
biz collect is designed for the opposite shape. It is an LLM-native business contacts API built for agents, workflow tools, scripts, and CRM enrichment. You call /api/v1/search with search parameters such as location, keywords, radius_km, and scrape_emails. The API returns a queued job. You poll /api/v1/jobs/:id until it completes, then use the returned JSON records in the rest of your n8n workflow. If you are still choosing a source, this comparison of how the Places API, a Google Maps scraper, and an API stack up helps you decide.
That means your n8n workflow can focus on lead routing:
- Run searches on a schedule or from a form submission.
- Request structured local business data from biz collect.
- Wait and poll until the async job completes.
- Split returned businesses into individual items.
- Filter, enrich, dedupe, or score records.
- Send qualified leads to Google Sheets, HubSpot, Slack, Airtable, Notion, or another destination.
For API details, start with the biz collect API docs, integration examples at Integrations, and plan information on Pricing. If you want to see the async search-and-poll model before you build, the how biz collect works page walks through the same request lifecycle this workflow automates. n8n's own documentation is useful for the standard nodes used here, especially the HTTP Request node, Wait node, IF node, and Google Sheets node.
What This Workflow Builds
The workflow in this tutorial automates local leads from search request to destination output. It uses standard n8n workflow behavior and HTTP nodes, with biz collect handling the business search and n8n handling orchestration.
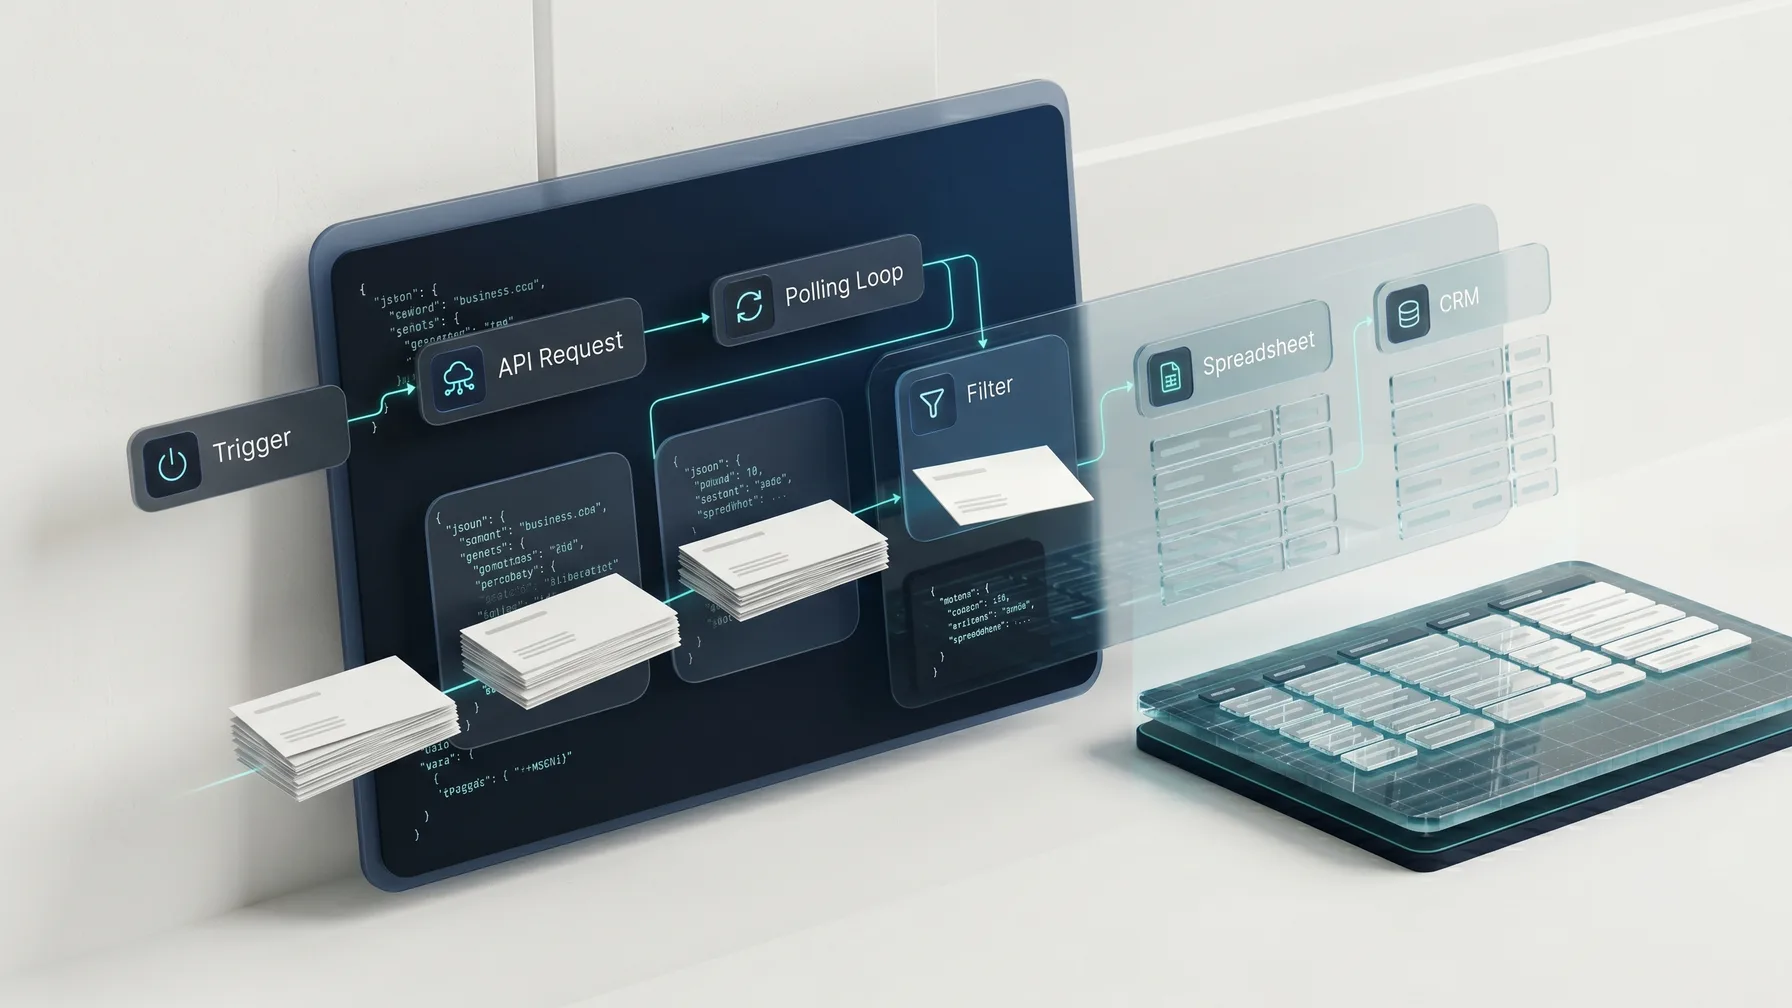
The final workflow looks like this:
- A trigger starts the workflow manually, on a schedule, or from a webhook.
- An HTTP Request node sends a
POSTrequest to biz collect/api/v1/search. - The response returns a
job_idand job status. - A Wait node pauses briefly before polling.
- A second HTTP Request node calls
/api/v1/jobs/:id. - An IF node checks whether the job status is
completed. - If not completed, the workflow waits and polls again, with a retry limit.
- Once completed, a Code node or item-splitting node turns returned businesses into individual n8n items.
- Destination nodes send leads to Google Sheets, HubSpot, Slack, or another system.
- Error branches handle failed jobs, timeouts, and empty result sets.
You can adapt the same pattern for one-off prospecting, recurring market scans, agency lead lists, CRM enrichment, local SEO research, partner discovery, or AI-agent workflows that need verified local business contact data.
Prerequisites
Before building the workflow, you need:
- An n8n instance, either n8n Cloud or self-hosted.
- A biz collect API key.
- A destination for the leads, such as Google Sheets, HubSpot, or Slack.
- A clear search definition: location, business category keywords, radius, and whether to extract emails from websites.
biz collect is currently free to start with 200 signup credits and no credit card required. That is enough to build, test, and run small prospecting jobs before committing the automation to a production schedule. Check Pricing for the current plan limits.
Data Flow and API Shape
biz collect uses an async job flow because local business search and website email extraction can take longer than a normal synchronous HTTP request. n8n handles this well because workflows can wait, branch, and poll.
The basic request is a POST to:
https://bizcollect.dev/api/v1/search
The body includes the local search inputs:
{
  "location": "Austin, TX",
  "keywords": ["dentist", "orthodontist"],
  "radius_km": 15,
  "scrape_emails": true
}
The response contains a job identifier. The exact response may include additional fields, but the workflow only needs the job_id and status:
{
  "job_id": "job_123456",
  "status": "queued",
  "poll_url": "/api/v1/jobs/job_123456"
}
Then n8n polls:
GET https://bizcollect.dev/api/v1/jobs/job_123456
When completed, the result contains structured business records. A representative completed response looks like this:
{
  "job_id": "job_123456",
  "status": "completed",
  "businesses": [
    {
      "name": "Example Dental Studio",
      "address": "123 Main St, Austin, TX 78701",
      "phone": "+1 512-555-0101",
      "website": "https://exampledentalstudio.com",
      "emails": ["hello@exampledentalstudio.com", "office@exampledentalstudio.com"]
    }
  ]
}
The workflow contract is stable: start a search, receive a job_id, poll the job endpoint, then process structured JSON records. For the authoritative schema, use the OpenAPI reference in the biz collect docs.
Step 1: Create the Trigger
Start with the trigger that matches your use case. The three common choices are:
- Manual Trigger for testing and one-off search runs.
- Schedule Trigger for recurring prospecting, such as every Monday morning.
- Webhook Trigger when another system or agent should start a search dynamically.
For a first version, use a Manual Trigger and hard-code a location and keywords in the first HTTP node. Once the workflow is stable, replace fixed values with data from a Schedule Trigger, form submission, CRM segment, or webhook payload.
If you want the workflow to accept dynamic searches from another tool, use a Webhook Trigger and send a body like:
{
  "location": "Zurich, Switzerland",
  "keywords": ["law firm", "tax advisor"],
  "radius_km": 10,
  "scrape_emails": true
}
Then the biz collect request body can reference the incoming webhook fields with n8n expressions. Keep your first workflow simple, confirm the API response shape, then parameterize.
Step 2: Add the HTTP Request Node for /api/v1/search
Add an HTTP Request node after the trigger. Name it Start biz collect Search.
Configure the node:
- Method:
POST - URL:
https://bizcollect.dev/api/v1/search - Authentication: use an API key header or your preferred n8n credential setup
- Response format: JSON
- Send body: JSON
Use this authorization header:
Authorization: Bearer YOUR_BIZCOLLECT_API_KEY
Content-Type: application/json
For a fixed test search, use this JSON body:
{
  "location": "Miami, FL",
  "keywords": ["med spa", "aesthetic clinic"],
  "radius_km": 20,
  "scrape_emails": true
}
For a Webhook Trigger version, use expressions:
{
  "location": "={{ $json.location }}",
  "keywords": "={{ $json.keywords }}",
  "radius_km": "={{ $json.radius_km || 15 }}",
  "scrape_emails": "={{ $json.scrape_emails ?? true }}"
}
If your trigger passes keywords as a comma-separated string instead of an array, normalize it before the HTTP request with a Set node or Code node. biz collect expects clear keyword input; an array is usually easiest to control in automation.
Example Code node normalization:
const keywords = Array.isArray($json.keywords)
  ? $json.keywords
  : String($json.keywords || "")
      .split(",")
      .map((keyword) => keyword.trim())
      .filter(Boolean);

return [
  {
    json: {
      location: $json.location,
      keywords,
      radius_km: Number($json.radius_km || 15),
      scrape_emails: $json.scrape_emails !== false
    }
  }
];
Then reference the normalized fields in the HTTP body:
{
  "location": "={{ $json.location }}",
  "keywords": "={{ $json.keywords }}",
  "radius_km": "={{ $json.radius_km }}",
  "scrape_emails": "={{ $json.scrape_emails }}"
}
After this node runs, you should have an item with job_id, status, and possibly poll_url. If the request fails, check the API key, request body, and current limits in Pricing.
Step 3: Store the Job ID for Polling
Before polling, make sure the job_id is available to later nodes. In many n8n workflows, the next node can directly reference:
{{ $json.job_id }}
If you prefer to make the workflow more explicit, add a Set node named Keep Job ID with fields:
{
  "job_id": "={{ $json.job_id }}",
  "poll_url": "={{ $json.poll_url }}",
  "poll_attempt": 0
}
This gives the polling loop a clean item shape. A retry counter is useful because every async workflow should have a clear stop condition. Even when the API is healthy, network failures, bad inputs, or downstream limits can happen. A workflow that can only loop forever is difficult to operate.
Step 4: Wait Before the First Poll
Add a Wait node after the search request. Name it Wait Before Polling.
For most workflows, start with a short delay such as 10 to 30 seconds. Email extraction requires the API to visit business websites, parse pages, and dedupe candidate addresses, so polling immediately after the search request usually adds noise without improving the outcome.
A practical starting point:
- Wait amount:
15 - Unit: seconds
For large radius searches or broad keyword sets, increase the delay. For small enrichment jobs, reduce it. You can tune this after observing real job durations in your account.
Step 5: Poll /api/v1/jobs/:id
Add another HTTP Request node named Poll biz collect Job.
Configure it:
- Method:
GET - URL:
=https://bizcollect.dev/api/v1/jobs/{{ $json.job_id }} - Authentication: same API key header as the search request
- Response format: JSON
Headers:
Authorization: Bearer YOUR_BIZCOLLECT_API_KEY
The polling response should include the current job status. Your workflow should branch on that status rather than assuming the first poll is complete.
Typical statuses to handle:
queuedorrunning: wait and poll again.completed: processbusinesses.failed: stop the workflow and alert someone or log the failure.
Use the actual status fields from the API docs as your source of truth. The workflow logic stays the same even if you add more status-specific handling later.
Step 6: Add an IF Node for Completed Jobs
Add an IF node named Is Job Completed?.
The main condition should check:
{{ $json.status }} equals completed
The true branch continues to result processing. The false branch needs more logic because a job can still be running, or it can have failed.
For a first workflow, add a second IF node on the false branch named Did Job Fail?:
{{ $json.status }} equals failed
If failed is true, send a Slack alert, write an error row, or stop execution. If failed is false, assume the job is still pending or running and continue to a retry counter.
This creates a clear branch:
- Completed: split and output leads.
- Failed: report the failure.
- Still working: wait and poll again.
Step 7: Add Retry and Timeout Logic
A production n8n business email extraction workflow should not poll forever. Add a retry counter before the loop returns to the Wait node.
One simple method is to insert a Code node named Increment Poll Attempt on the still-running branch:
const attempt = Number($json.poll_attempt || 0) + 1;

return [
  {
    json: {
      ...$json,
      poll_attempt: attempt,
      max_poll_attempts: Number($json.max_poll_attempts || 20)
    }
  }
];
Then add an IF node named Can Poll Again?:
{{ $json.poll_attempt }} is smaller than {{ $json.max_poll_attempts }}
If true, connect back to the Wait node and poll again. If false, send a timeout alert or write the job to an error destination for follow-up.
With a 15-second Wait node and 20 max attempts, the workflow waits roughly five minutes before timing out. You can adjust those numbers for your use case:
- Fast prospecting tests: 10 attempts at 10 seconds.
- Email extraction jobs: 20 attempts at 15 seconds.
- Large recurring searches: 30 attempts at 30 seconds.
The right value is operational, not theoretical. Set a limit that gives normal jobs time to complete while still surfacing unexpected delays.
Step 8: Split Businesses Into Individual Items
Once status is completed, the response contains an array of businesses. Most destination nodes work best when each business is its own n8n item.
Add a Code node named Split Businesses.
Use this code:
const businesses = $json.businesses || [];

return businesses.map((business) => ({
  json: {
    job_id: $json.job_id,
    name: business.name || "",
    address: business.address || "",
    phone: business.phone || "",
    website: business.website || "",
    emails: business.emails || [],
    primary_email: Array.isArray(business.emails) && business.emails.length > 0
      ? business.emails[0]
      : "",
    email_count: Array.isArray(business.emails) ? business.emails.length : 0
  }
}));
This gives every downstream node a predictable item shape:
{
  "job_id": "job_123456",
  "name": "Example Dental Studio",
  "address": "123 Main St, Austin, TX 78701",
  "phone": "+1 512-555-0101",
  "website": "https://exampledentalstudio.com",
  "emails": ["hello@exampledentalstudio.com"],
  "primary_email": "hello@exampledentalstudio.com",
  "email_count": 1
}
If the workflow is specifically for outbound sales, add a filter after splitting:
{{ $json.primary_email }} is not empty
That keeps the CRM or spreadsheet focused on leads with direct contact data. If your sales team also calls prospects, keep records with phone numbers even when no email is found.
Step 9: Send Leads to Google Sheets
Google Sheets is the easiest first destination because it makes the output visible and easy to inspect. Add a Google Sheets node after Split Businesses.
Recommended columns:
Search Job IDBusiness NameAddressPhoneWebsitePrimary EmailAll EmailsEmail CountCreated At
Map fields like this:
{
  "Search Job ID": "={{ $json.job_id }}",
  "Business Name": "={{ $json.name }}",
  "Address": "={{ $json.address }}",
  "Phone": "={{ $json.phone }}",
  "Website": "={{ $json.website }}",
  "Primary Email": "={{ $json.primary_email }}",
  "All Emails": "={{ $json.emails.join(', ') }}",
  "Email Count": "={{ $json.email_count }}",
  "Created At": "={{ new Date().toISOString() }}"
}
For a lightweight dedupe strategy, use the website or primary email as the unique value. If your Google Sheets setup only appends rows, add a later cleanup step or use a database destination for stricter uniqueness. For CRM workflows, deduplication should normally happen before creating new company or contact records.
Step 10: Send Qualified Leads to HubSpot
For HubSpot, the most common flow is:
- Search for an existing company by domain or website.
- If no match exists, create a company.
- If
primary_emailexists, search for an existing contact by email. - If no contact exists, create a contact.
- Associate the contact with the company if your HubSpot setup requires it.
The exact HubSpot node configuration depends on your account, properties, and object model, so keep the first version conservative. Do not create duplicate contacts just because a business has multiple emails. Start with primary_email, then optionally store the full deduped email list in a custom property or note.
Useful company mapping:
{
  "name": "={{ $json.name }}",
  "domain": "={{ $json.website.replace(/^https?:\\/\\//, '').replace(/^www\\./, '').split('/')[0] }}",
  "phone": "={{ $json.phone }}",
  "address": "={{ $json.address }}",
  "website": "={{ $json.website }}"
}
Useful contact mapping:
{
  "email": "={{ $json.primary_email }}",
  "company": "={{ $json.name }}",
  "phone": "={{ $json.phone }}",
  "website": "={{ $json.website }}"
}
If your CRM has strict data rules, add validation before HubSpot:
- Only create contacts when
primary_emailis not empty. - Only create companies when
websiteorphoneis present. - Add a source field such as
biz collect n8n workflow. - Add the search location and keyword set as campaign context.
That makes it easier to report on which local searches generated useful leads.
Step 11: Send a Slack Summary
Slack is useful for operational visibility. Instead of posting every lead individually, post a compact summary when a job completes.
Add a Code node before the Slack node if you need to summarize the completed job before splitting:
const businesses = $json.businesses || [];
const withEmail = businesses.filter((business) =>
  Array.isArray(business.emails) && business.emails.length > 0
);

return [
  {
    json: {
      job_id: $json.job_id,
      status: $json.status,
      business_count: businesses.length,
      businesses_with_email: withEmail.length,
      sample_names: businesses.slice(0, 5).map((business) => business.name).join(", ")
    }
  }
];
Then send a Slack message:
biz collect job {{ $json.job_id }} completed.
Businesses found: {{ $json.business_count }}
With email: {{ $json.businesses_with_email }}
Sample: {{ $json.sample_names }}
For error branches, send a different message:
biz collect job {{ $json.job_id }} did not complete.
Status: {{ $json.status }}
Poll attempts: {{ $json.poll_attempt }}
This gives you enough context to monitor recurring workflows without opening n8n for every run.
Recommended Workflow Layout
Here is the complete node sequence for a practical version:
Manual Trigger
  -> Start biz collect Search
  -> Keep Job ID
  -> Wait Before Polling
  -> Poll biz collect Job
  -> Is Job Completed?
      true:
        -> Split Businesses
        -> Has Email?
        -> Google Sheets / HubSpot / Slack
      false:
        -> Did Job Fail?
            true:
              -> Slack Error Alert
            false:
              -> Increment Poll Attempt
              -> Can Poll Again?
                  true:
                    -> Wait Before Polling
                  false:
                    -> Slack Timeout Alert
This pattern is intentionally simple. It avoids custom infrastructure while still handling the realities of async APIs: work can be queued, jobs can run for a while, and failed or long-running jobs need an operator-friendly path.
Error Handling Checklist
Do not leave error handling until later. A lead generation workflow usually runs on a schedule, which means silent failures create stale pipelines.
Add handling for these cases:
- Unauthorized request: API key missing or invalid. Stop immediately and notify the workflow owner.
- Bad request: missing
location, emptykeywords, or invalidradius_km. Write the failed input to an error sheet. - Rate or plan limit: pause the workflow and send an alert with a link to Pricing.
- Job failed: notify Slack and include the
job_id. - Job timeout: include
poll_attemptand the last known status. - No businesses returned: write a successful but empty result with the search parameters.
- Businesses without emails: keep them if phone outreach or website review matters; filter them out if email is required.
For scheduled workflows, add an execution log destination. A simple Google Sheet works:
{
  "timestamp": "={{ new Date().toISOString() }}",
  "location": "={{ $json.location }}",
  "keywords": "={{ Array.isArray($json.keywords) ? $json.keywords.join(', ') : $json.keywords }}",
  "job_id": "={{ $json.job_id }}",
  "status": "={{ $json.status }}",
  "poll_attempt": "={{ $json.poll_attempt || 0 }}"
}
This makes debugging easier when a stakeholder asks why a particular territory did not produce new leads.
Deduplication and Lead Quality Rules
biz collect dedupes contact emails extracted from business websites, but you should still dedupe at your destination level. The same business can appear across different searches, especially when keyword sets overlap.
Good dedupe keys:
- Website domain
- Primary email
- Phone number
- Combination of business name and address
For Google Sheets, a simple formula or lookup can flag duplicates. For HubSpot and other CRMs, use native search-before-create steps. For databases, enforce uniqueness on a normalized website domain or primary email when possible.
You can also add lead quality scoring in n8n:
let score = 0;

if ($json.website) score += 20;
if ($json.phone) score += 15;
if ($json.primary_email) score += 40;
if ($json.email_count > 1) score += 10;
if ($json.address) score += 15;

return [
  {
    json: {
      ...$json,
      lead_score: score,
      qualified: score >= 60
    }
  }
];
Then branch:
{{ $json.qualified }} is true
Qualified leads go to HubSpot. Lower-scoring leads go to a review sheet. This keeps your CRM cleaner while preserving useful market data.
Start Building
The simplest useful n8n lead generation workflow is only a few nodes: trigger, HTTP request, wait, poll, IF, split, and output. The value comes from using an API that returns structured business data and verified website emails instead of asking n8n to maintain a scraper.
biz collect is built for this exact pattern: one POST request to start a local business search, async polling for completion, stable JSON fields, OpenAPI 3.1 docs, and deduped contact emails extracted from business websites. It fits n8n, Make, Zapier, scripts, LLM tools, and CRM enrichment workflows without headless browser maintenance. If you are still weighing options, the guide to the best local business lead generation tools in 2026 shows where an n8n-plus-API workflow fits among scrapers, no-code tools, and CRMs.
You can start free with 200 signup credits and no credit card. Open the API docs, review the integrations, check pricing, and build your first automated local leads workflow in n8n today.
Frequently asked questions
- How do I build a lead generation workflow in n8n?
- Chain five stages: a trigger, an HTTP Request node that POSTs a city and keywords to /v1/search, a second HTTP Request node plus a Wait node that polls /v1/jobs/:id until complete, a filter, and a Google Sheets or CRM node to write the leads.
- Which n8n nodes do I need?
- Two HTTP Request nodes (search and poll), a Wait node with a loop for polling, a Filter or IF node, and a destination node such as Google Sheets or your CRM. No custom code is required.
- How do I poll for completion in n8n?
- Call /v1/jobs/:id from an HTTP Request node, add a Wait node, and loop until the job status is complete; then read the structured JSON results.
- Can I get verified emails from the workflow?
- biz collect enriches each business from its website, so records can include email, website, phone, and social profiles. Filter for records that contain an email and a website to keep only the leads you can act on.
- Does this work with Zapier or Make too?
- Yes. The API uses standard HTTP requests, so the same search-poll-filter-write pattern works in Zapier and Make as well as n8n.
- Is there a free tier to test the workflow?
- Yes. You get 200 signup credits plus 20 login credits each day with no credit card, which is enough to wire up and validate the full workflow.